Warning: strpos() expects parameter 1 to be string, array given in /volume1/web/wordpress/wp-includes/blocks.php on line 20
Warning: strpos() expects parameter 1 to be string, array given in /volume1/web/wordpress/wp-includes/blocks.php on line 20
Warning: strpos() expects parameter 1 to be string, array given in /volume1/web/wordpress/wp-includes/blocks.php on line 20
Campers – WorldofWills
I’ve long been a sceptic about the use of solar power on motorhomes; I couldn’t see the point in all that extra weight on the van roof just for a little bit of power. However, the use of a portable solar panel for emergency use might be a good idea. To this end, I bought a Renogy 100Watt folding solar panel and a Victron MPPT 75/15 solar charge controller, and plumbed the controller through the EBL as an ‘ancillary charger’.
The Renogy panel does not have a controller fitted as most do, which is why I chose it. The Victron charge controller that we bought has a Bluetooth interface so can be monitored at a distance, albeit short.
The first real opportunity to try the solar panel was June 10-12th, during our stay in the New Forest when it was nice and sunny.
On the morning of Thursday 10th, our battery capacity was showing as 90% so I deployed the panel.
I was staggered. The panel harvested up to 123Watts and provided a charge current of around 9Amps! As the battery charged, the current dropped off but remained around 7A for some time. Within a few hours the charger controller had dropped back to its ‘float’ mode and the batteries were fully charged. Although, when on ‘float’ charge the panel only harvested around 70W.
The way in which the controller is connected to the EBL means that I can only charge the habitation battery. A modification I will make is to fabricate a splitter cable that allows the charger to connect to either the habitation battery or the van starter battery.
I really must say that I am hugely impressed with the panel/charger combination but am still not going to have solar panels fitted on the van roof.
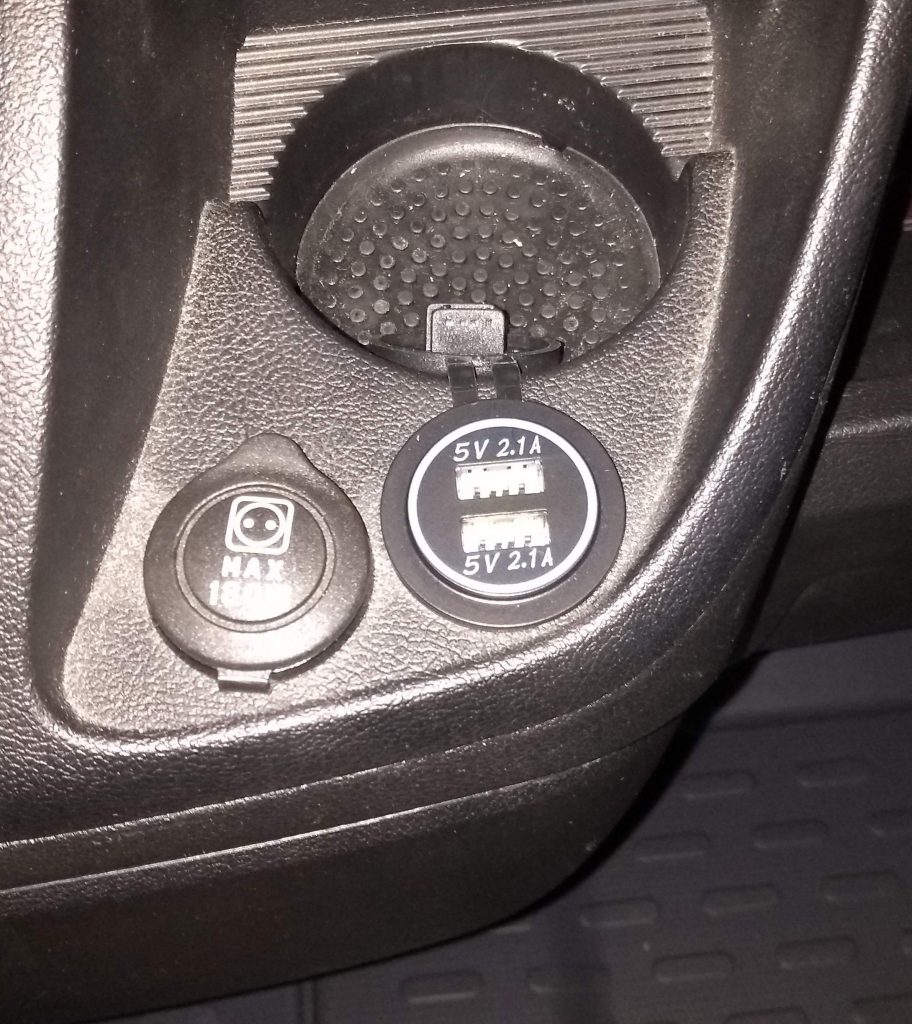
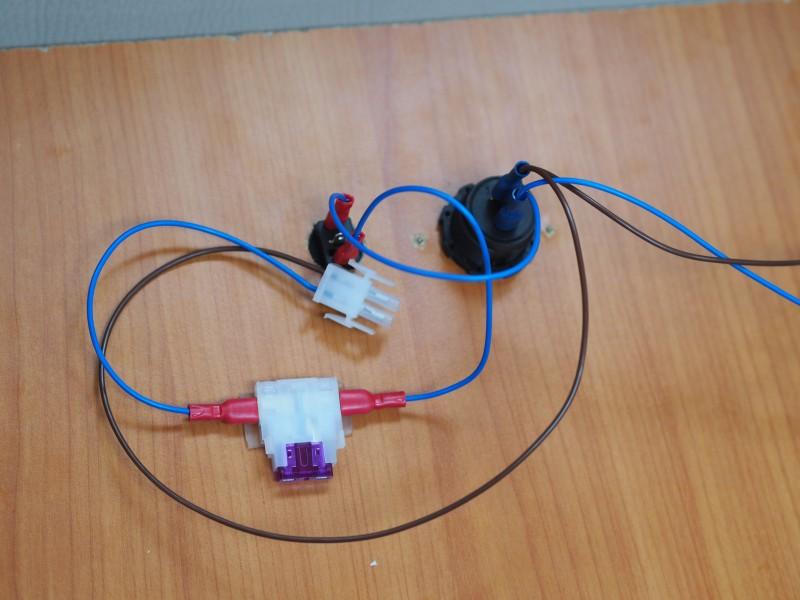
We had already updated the van’s USB charging capability by adding in 2 switched USB sockets in the ‘tech’ cupboard and had added a 5Amp 4 USB socket, all connected to the leisure batteries, however, we had limited USB charging ability in the van’s cab. In the cab there is the standard Ducato 180W 12V socket alongside the unused lighter socket. Occasionally we use a double USB plug in these sockets, but decided to replace the lighter socket with a proper USB socket to provide 2 x 2.1Amp outlets.
Connecting the new socket was a breeze; the dash disassembled easily and the lighter socket was quickly removed. The crimp connectors on the new USB socket connected to the van’s wiring so no modification was necessary. The new socket is fused separately by its own 5A fuse as well as by a 15A fuse in main fuse box.
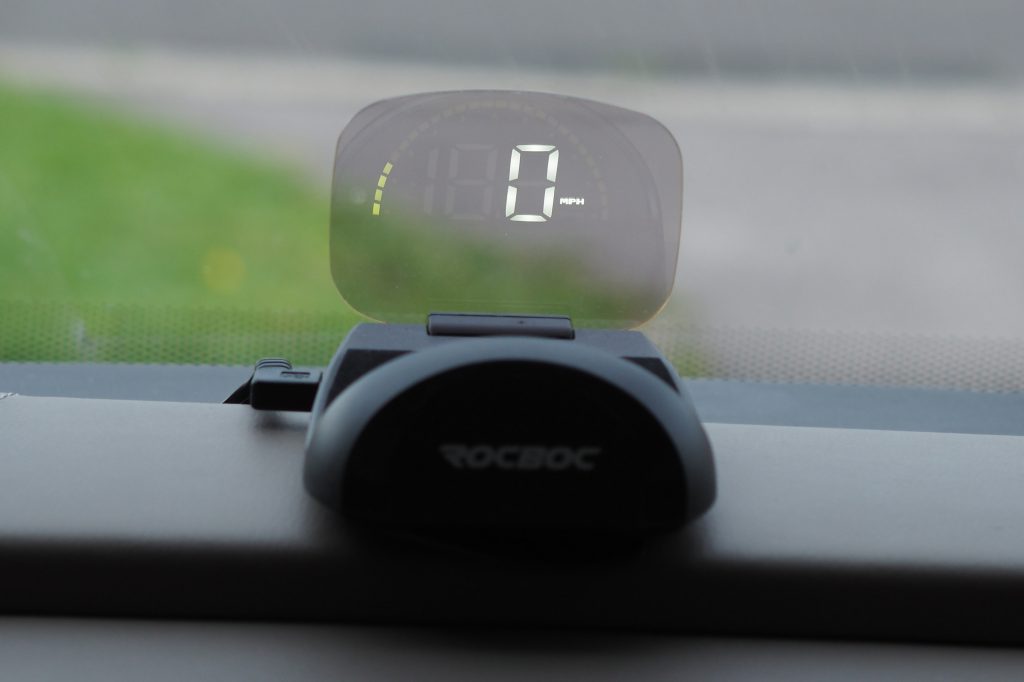
The dash display on the Ducato is not particularly well lit and looking at the speedo means taking one’s eyes off the road. The speedo reads in mph, which is not brilliant when abroad. I do use the sat-nav to tell me the speed, but there again, that means taking my eyes off the road. To provide a bigger, better, clearer display of speed we bought a HUD (head up display).
The HUD is mounted in our usual line of vision and can be powered from either USB or ODBII.
When powered by USB, the HUD estimates the vehicle speed using GPS. When powered from the ODBII socket the HUD uses the van’s on board diagnostics to display speed in mph or kph, water temperature, battery voltage, engine revs etc. We have connected ours to the ODBII socket and hidden the cable in the dash panel.
There is a lot of “discussion” in forums about the type of battery that should be fitted in a motorhome, and why some types are deemed to be unsuitable. In order to help me decide on which battery to buy to replace our existing battery I have pulled together the following information.
Summary of battery types
Wet lead acid: traditional old fashioned wet cell technology. Charging the battery heats the electrolyte and causes gassing.These batteries must be maintained by topping up with distilled water. They must also be vented and should NOT be mounted inside a motorhome. As the electrolyte is a liquid, wet cells are more susceptible to vibration. Some are sealed so shouldn’t require topping up. Electrolyte is liquid so can spill in a crash.
EFB: Enhanced flooded battery: A step up from the wet cells, still a wet cell battery but does not need topping up. Supposedly sealed but still should be vented. Electrolyte is liquid so can spill in a crash and they will be susceptible to vibration. Charge regime as per wet lead acid battery.
Absorbed Glass Matt (AGM): this is the most contentious battery type. It was introduced as a completely sealed, high power, deep discharge, rapid charging, high performance battery. They are less susceptible to vibration as their electrolyte is encapsulated in the glass matt. AGM batteries are fully sealed and do not need venting. They can be mounted inside the motorhome.
Gel: Gel batteries are another deep discharge, rapid charging battery type that are completely sealed. Due to their construction, gel batteries can be mounted at any angle or orientation and are suitable for mounting inside a motorhome.
Gel batteries perform better than AGM when deep discharged, meaning that they will provide a greater number of recharge cycles, they perform better at higher temperatures than AGM and are less sensitive to thermal runaway.
Gel batteries recharge much faster than flooded-cell batteries, provided that a regulated charge voltage is temperature compensated, but cannot be charged as quickly as AGM.
Gel batteries are extremely sensitive to charge voltages above 14.1-volts DC at 68 degrees.
There are many posts in the forums from people whose batteries have failed after 1 or 2 years and many blame the AGM technology.
My current battery is a Banner AGM. It is 5 years old and still retains its charge. My “usage pattern” is one of low rate of discharge – we have LED lighting and rarely use the TV; we also keep it on trickle charge when the ‘van is parked at home. We have not gone off-grid for more than 3 days at a time, the last time being in the New Forest in October where we needed lighting, water pump, satellite (radio) and heating. The battery discharged to 12.3volts by the end of the 3 days and was showing as fully charged by the time we arrived home, less than an hour’s drive away.
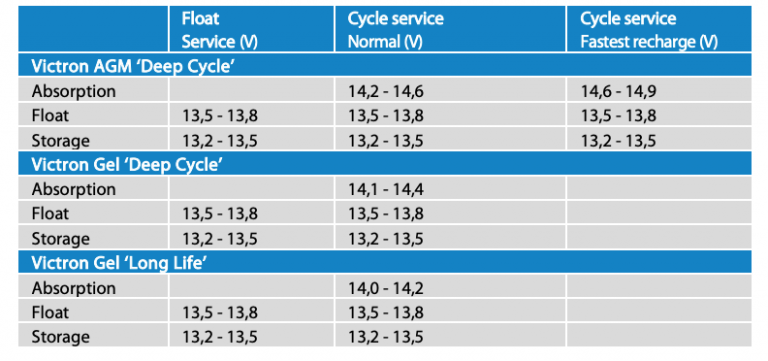
Much of the “noise” around the suitability of AGM batteries seems to be that they are unsuitable if you cannot charge the battery at 14.7V. The following graphic is from the Victron site and clearly shows that the normal charging voltage for an AGM battery should be between 14.2 and 14.6 volts. The ‘van’s alternator voltage is 14.4 and the EBL is capable of 14.4V which fall in the normal service charge range for an AGM battery.
From the Victron table above it looks like 14.6-14.9V is needed to perform a fast recharge of the battery as opposed to a ‘normal’ recharge.
Banner specify a maximum charging voltage for AGM at 14.8V.
An AGM is capable of a fast recharge which would mean supplying 14.6-14.9 volts.
An AGM has very low internal resistance allowing it to be charged very quickly. Low internal resistance combined with a low state of charge and applying >14.4V will lead to a high current charging so will necessitate using a charger capable of providing around 25% of the battery rating to adequately charge. For a 100Ah battery, the charger should be rated at least 25A.
Low internal resistance also leads to better high current discharge rates than wet cell batteries hence exhibit a greater number of charge-discharge cycles.
AGM batteries require precise, voltage-regulated, temperature-compensated charging routines. AGM batteries can accept a very high charge rate, a charge rate unlikely to be provided by most van battery chargers. Chargers should be connected to a battery mounted temperature sensor to prevent thermal runaway.
Gel: Gel batteries are another deep discharge, rapid charging battery type that are completely sealed. Due to their construction, gel batteries can be mounted at any angle or orientation and are suitable for mounting inside a motorhome.
Gel batteries perform better than AGM when deep discharged, meaning that they will provide a greater number of recharge cycles, they perform better at higher temperatures than AGM and are less sensitive to thermal runaway.
Gel batteries recharge much faster than flooded-cell batteries, provided that a regulated charge voltage is temperature compensated.
Gel batteries are extremely sensitive to charge voltages above 14.1-volts DC at 68C.
Notes:
Our on-board Schaudt EBL 29 has battery charge settings for “wet” and “gel”, but does not have a setting for AGM so cannot provide the higher 14.6-14.9V required to rapidly recharge an AGM.
The Schaudt EBL 29 contains a Schaudt LAS 1218 charger and can provide up to 18A charging current.
The Schaudt EBL charges both the habitation and cab batteries.
The Fiat cab alternator supplies a charging voltage of approx 14.4V
Thoughts:
Wet cells, even the EFB (enhanced flooded battery) are really only capable of a maximum of around 200 recharge cycles. They are not capable of rapid charge and discharge, they will also need to be vented.
EFB cells are really only suitable for low power requirements where the rate of discharge is low.
Adding a second habitation battery may require a second charger to be fitted although the EBL could charge 2 95Ah batteries, but this would be an edge condition and is outside the spec of the EBL29. As gel batteries charge at a slower rate than AGM, the EBL could support 2*80Ah gel batteries.
A second charger could be connected directly to the batteries or connected as an auxiliary charger through the EBL. The EBL auxiliary charger is fused at 20A charge current. A suitable charger is the “blind” Apuljack Engineering AE276Plus or one of the Victron Blue Smart chargers, in particular the 15A charger.
A Gel battery will typically provide 600 recharge cycles
An AGM battery will typically provide 400 recharge cycles
An AGM can be charged at a faster rate than Gel or wet.
A wet or EFB battery will be unlikely to provide up to 200 cycles
Single replacement battery costs
Wet/EFB (100Ah)
AGM (95Ah)
Gel (80Ah)
Cost
120
170
180
Additional charger
–
Total
120
170
180
Dual replacement battery costs
Wet (100Ah)
AGM (95Ah)
Gel (80Ah)
Cost
240
340
360
Additional charger
140
140
0
Sundries (cable, sockets)
40
40
40
Total
420
520
400
Conclusion
EFB batteries are not suitable for any kind of wild camping as they exhibit too few charge/recharge cycles.
Both AGM and Gel batteries require a well-regulated charging system. Without a voltage regulated, three-stage battery charger with temperature compensation then you should not expect to achieve the battery’s rated life cycle.
With a correctly rated charger capable of 3+ stage charging and temperature compensation AGM should provide a long lasting, high performance battery power
In addition, the AGM and gel’s self-discharge rate is extremely low. Flooded-cell batteries self-discharge 1 percent per day or 30 percent per month (at 68 degrees), while VRLA batteries self-discharge generally less than 2 percent per month.
Habitation batteries will not recharge fully from the van alternator and should be regularly charged using a well regulated 3+ stage charger.
We have to consider the motorhome 12V power supply system in its entirety and not just look at individual components. Focussing on the battery without addressing its usage or charging requirements will result in less than optimal power delivery and increased costs.
My latest obsession has been with gas for our BBQ. We have already sorted out a refillable gas system for the van, but wanted to improve on the gas BBQ. We have a super little Weber Q1200 gas grill that we cook on outside when we are out camping, we cook outside because we don’t want the smell of cooking in the van. The Weber is really excellent, however, it uses the small disposable 450g butane & propane gas bottles. The bottles retail at around £7-8 each, and can occassionally can be found for £24 for a box of 6. These bottles are disposable and each one will last a maximum of 3 hours so when we go away for a few weeks we take 5 or 6 gas bottles with us.
The small gas bottles are handy and can be easily stored in the van’s external drawer, but the need to cart around several is a pain. Rather than keep buying disposable canisters and adding to landfill, I started to look around at refillable alternatives. We needed a refillable gas bottle that ideally could fit in the van’s rear boot which is only about 12″ high, and we have to be able to refill the gas in the UK and abroad. These factors rule out anything Calor have to offer as Calor is only available in the UK. There are a few refillable bottles available such as those from Gaslow or Safefill, but they are expensive (between £130-150) and it is difficult finding anywhere that allows you to refill one.
That only really leaves Campingaz, but Campingaz charges rip off prices in the UK. At go-outdoors, a new 907 bottle (2.7kg) full of gas will set you back an eye-watering £40 for an empty bottle and then an additional £34.99 for the gas, a total of £74.99 for the initial outlay. Prices are slightly lower in France, £33 for a new empty bottle and £22 for a refill.
I will not pay £40 for an empty bottle, and I will not pay £34.99 for 5 litres of gas. That works out at £7 per litre whereas autogas is currently around 68p per litre on Shell’s Titchfield forecourt.
I started looking on ebay and gumtree for cast offs, bottles that people had finished with and were selling and found one straight away down in Gosport, 6 miles from home. At the end of the auction period I had ‘won’ the bottle, duly paid my £11.40 and went and collected my half full bottle, or is it half empty? One decent condition bottle with 1.3Kg of gas for £11.40. Amazing.
I converted the Weber to use a refillable gas bottle, connected it all up and gave it a try. Then the thought crossed my head ‘what if we run out of campingaz?’, so I started looking for a cheap spare bottle. A few days later an advert for 2 gas bottles and sundry bits not 6 miles away popped up so I picked up another 2 bottles, one of them full to the brim.
We have a bottle and a half of gas, and one empty bottle. The 907 cylinder holds about 6 times the volume of gas as the small bottles so should give us around 15-18 hours of cooking time. When we go on holiday to France later this year we’ll use what is left in the partially filled bottle and exchange it and the empty one for full bottles at the lower French prices.
The price of bottled gas is extortionate, particularly with the campingaz bottles. I do not intend to run the BBQ at home on campingaz at these prices so looked for a Calor bottle on ebay.
I managed to pick up an empty Calor 7Kg butane bottle for £5 so avoiding Calor’s £40 hard-to-get-refunded initial deposit. I’ll exchange it for a full one sometime in the spring when the BBQ’ing season starts, but £5 for a perfectly good cylinder that I could return to Calor and receive £7.50 in return is a fair deal. A refill for this cylinder will cost me £24 for 7kg of butane, that’s less than half the price per kilo charged for campingaz.
It’s going to be one long summer of BBQ’s, I just hope the rain stops soon.
Update for April, Fiona decided that she wanted a gas BBQ for home so went out and bought a Weber Q2200. Now we have to find a Calor propane bottle with the 27mm push-on connector.
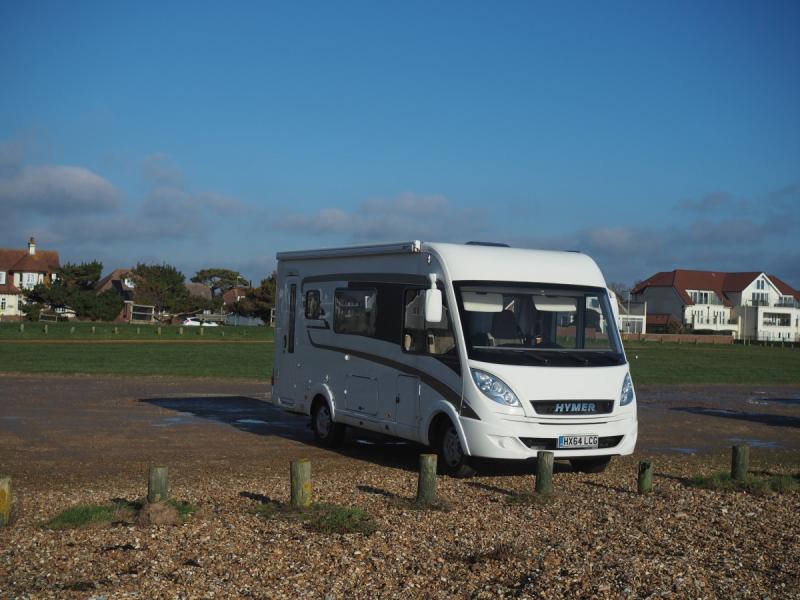
It was about time we took the van for a blast down the motorway if only to get the tyres turning and the oil pumping around the engine, so we settled on a picnic on the seafront at Hayling Island. There was a stiff cold breeze blowing, but it was nice and sunny. Our first selection of a parking place was on too much of a slope which made it awkward to walk around in the van, so we put our food away and moved about a quarter of a mile further along the sea front.
Once we had found a nice level space we turned on the gas, boiled the kettle and settled down for a mug of tea. There was no need to turn on the van’s heating as the sun shining through the windscreen warmed us up nicely.
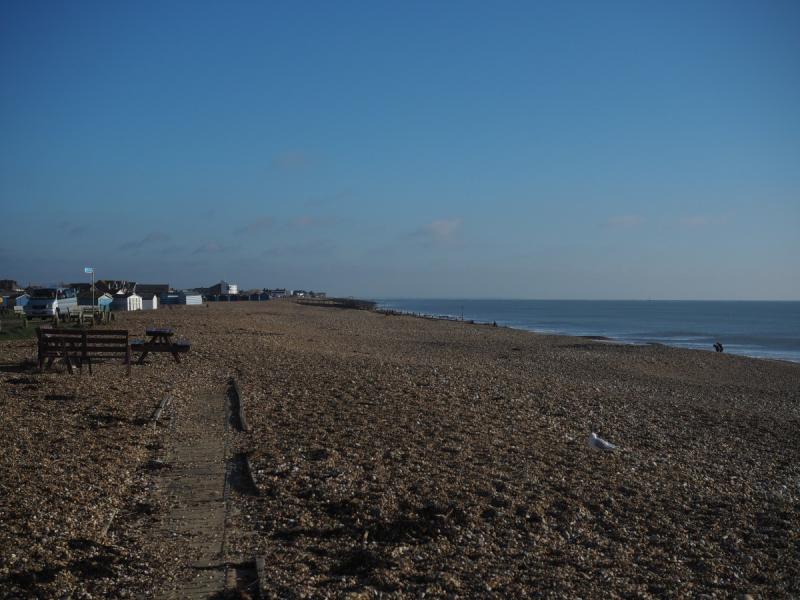
Hayling Island at the sea front
Here we are parked nice and level. We spent an hour or so enjoying the view and enjoying our lunch before heading home for dinner. Hayling sea front is a nice quiet place in the winter, it’s ideal for a long walk along the beach and what’s more – the parking is free in winter!.
Here is the view we enjoyed while relaxing over lunch.
Well,it’s time to put Elsie through her first MOT, thereby keeping our chums at DVLA happy. The MOT due date was 2nd October but we thought we’d get it done a few days early to give us time for any remedial work, should any be needed. Oh Ye of little faith…..
Having spoken to the people from Spitfire Garage of Woolston, Southampton, at the Caravan and Camping show in Romsey a few weekends ago, they enticed us by offering a generous 20% discount on the MOT cost, so we booked in for the morning of Tuesday, 26th September.
Finding Spitfire garage was easy enough,in fact we somehow arrived 30 mins early. There was a constant stream of HGVs coming and going, and lots of building work in the vicinity, so we had to carefully choose a parking spot, where we’d cause the least inconvenience- Elsie’s not up to fighting HGVs. After a short but stressful wait parked up, Spitfire were ready to do the MOT.
Fiona and I wandered off into Woolston. Within a few minutes we found Annie’s Cafe on Portsmouth Road and went in for a sit down. Annie’s was a real find; a spotless cafe where a mug of tea and a mug of coffee cost an amazing £1.60. We quite fancied the full English breakfast with toast, being enjoyed by the guy at the next table. That came in at around £4. Maybe next time, we’ll splash out on breakfast.
We returned to Spitfire Garage within the hour to be told that the van had passed its MOT and they were just finishing off the paperwork, and yes, the bill took into account the 20% discount.
All in all, great service from Spitfire and at Annie’s, so we’ll definitely use them both again.
The A3 was also due an MOT in October, however, on her arrival home from work on Thursday evening, Fiona invited me to hear the grinding noise that was coming from the rear end. The off-side rear brake caliper had seized. Bugger! I managed to get it loose by bouncing it over a small kerb, but the car was not really driveable over any distance in its current condition.
A call to Locks Heath garage early on Friday morning had us leaving the car with them for the day during which time they fitted new rear brake discs and pads and replaced the faulty caliper- we were back on the road again by late afternoon. When I collected the car, they offered to take it back on the following morning for its annual MOT, which thankfully it passed.
Next garage job? To sort out some niggles on Fiona’s MX-5. Then maybe decide whether we really need 3 vehicles.
Our ‘van is a 2014 model and brilliant though it is, one thing it lacked was USB sockets and we need plenty of those to charge our phones, tablets, iPod and the 4G mobile broadband modem. The cab area does have two 12 volt sockets, but these only function when the van ignition is switched on. There are no dedicated USB sockets in the habitation area. We do have some mains to USB adapters, but these are only useful when we are hooked up to a mains electric supply. There are two USB outlets on the satellite TV unit and we have been using these to power the Chromecast and the bluetooth speaker.
So I decided to install some additional USB power outlets.
The TV runs on a 10A circuit but really only draws around 2A maximum so I decided to extend the TV circuit rather than wire in a new circuit. A double USB socket can draw up to 3A at 5V, so doesn’t use too much on the 12V circuit.
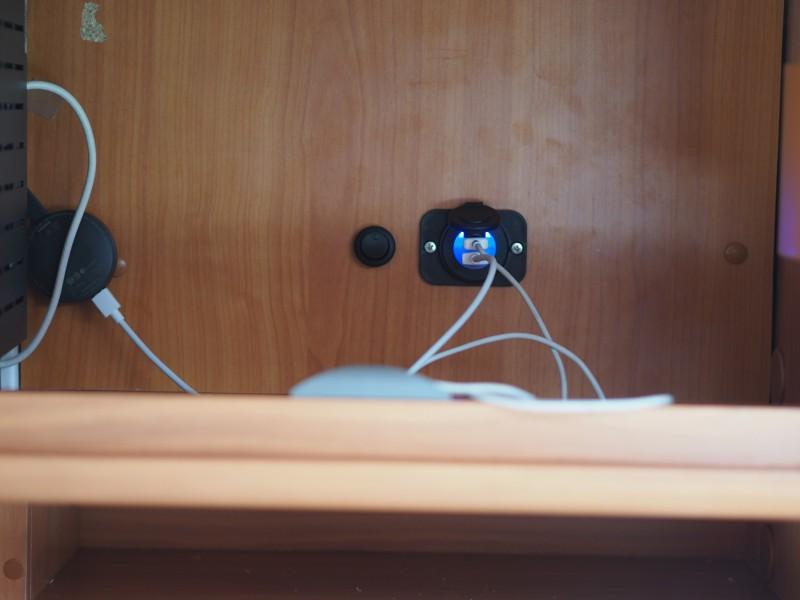
I got the necessary components from 12 Volt Planet and set about installing a double USB socket and an isolating switch with a fuse so that it can be switched off in the event of any problems. The van’s ‘tech’ cupboard already contains the Satellite TV box and has a blanking panel at the back to hide the excess cable. I decided to fit the USB socket and the switch onto this panel.
It’s now wired so that I can easily add another double USB socket if need be. It’s fused with a 3A fuse to be on the safe side. Now all I have to do is connect it to the van’s 12volt TV circuit. Simple eh?
Having removed the panel and drilled the holes, I then cut and crimped the wires while enjoying some afternoon sun in the garden.
Final product, in place and switched on, glowing nicely.
Proper USB charging
As this was quite a simple task, I now plan to install a few more USB sockets on the passenger side of the van, but next time I will install a new circuit rather than piggyback off an existing one.
TV reception in the van is a bit hit and miss. We have a satellite receiver and TV so can receive heaps of rubbish channels from all over the place as long as we have a direct line of sight to the satellite orbiting overhead. Most of the campsites we have used have been well wooded to provide shelter from the heat of the sun. Consequently we have been unable to receive satellite TV or radio channels for a fair proportion of the time we have spent in the van.
We have been able to receive 3G mobile phone and mobile internet signals though and have seldom been outside of mobile network coverage.
The EU recently has forced mobile phone operators to remove roaming charges throughout the EU and most of Europe which means that internet data is now much cheaper to use while abroad in the EU.
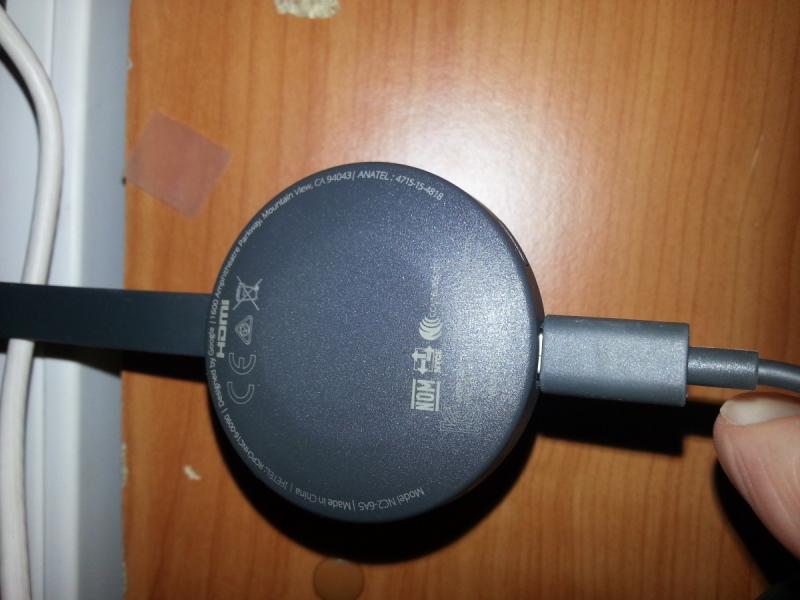
I recently bought a ChromeCast device from Currys, where the price had been discounted from £30 to £19 for one day only, and connected the Chromecast to the AV input of the van’s satellite receiver.
The chromecast is a media streaming device which can be controlled from a mobile phone. Video and audio channels (Youtube, iPlayer) are streamed from the mobile internet to the phone then ‘cast’ to the Chromecast device which outputs video and audio to the TV.
The Chromecast has a HDMI output port to connect to a TV and uses a USB connection to provide its power. We have the HDMI plugged into the satellite receivers ‘pass through’ HDMI input to provide the video and audio signal, and use one of the satellite receivers two USB ports to provide power.
I also bought an unlocked 4G LTE mobile broadband modem to replace my ageing 3G MiFi, which is locked to Three.
The TP-Link 7350 can use a SIM from Three, Orange or others to provide network access at 4G speeds.
The idea is to use a French Orange prepay SIM when we go to France next and avoid the back-haul through the Three network to the internet. The TP-Link provides the local WiFi network in the van that allows our mobile phones, tablets and Mac to connect to the internet as normal as well as to control video and audio streams to the Chromecast.
We tried this set-up out on our recent camping expedition to East Sussex and were able to stream BBC TV programs using the iPlayer video, BBC radio channels as well as Youtube videos to the van’s TV.
Well, on our first day at home I decided to investigate the broken satellite system. I pulled the covers off the cable trunking and using the volt meter measured the voltage on the power cable. While doing this I discovered that the live wire to the satellite receiver was disconnected. It looks like it had never been fully connected and had possibly rattled its way loose during our drive. I reconnected the cable properly and behold, we have Cbeebies and other assorted rubbish on the TV. What a simple fix.
Now where did I leave that damned water filler cap?
Update: a visit to Southdowns Motorhomes Centre this week solved our water filler problem, we bought a new filler cap complete with keys for the sum of £15.22. Sorted.
It’s winter. It’s pretty cold and I don’t want the van to get too cold inside or it’ll take forever to warm up.
We do have a portable halogen heater that we bought in Aldi, but I’m not too happy putting it on a timer to switch on overnight so we bought a small 1Kw oil filled radiator that we will connect on a timer so that it keeps the van warm at night.
An electric heater is fine when we are on electric hookup, however a 1Kw heater is not going to keep us warm if we are out and about in the van in the depths of winter. The best way to keep the van warm when not connected to the electricity supply is to use its gas fired blown-air central heating system. The problem with this is that we use the same gas bottle to power the kitchen hob and the fridge, and we only have the one 11Kg propane bottle, and we really don’t want to run out of gas.
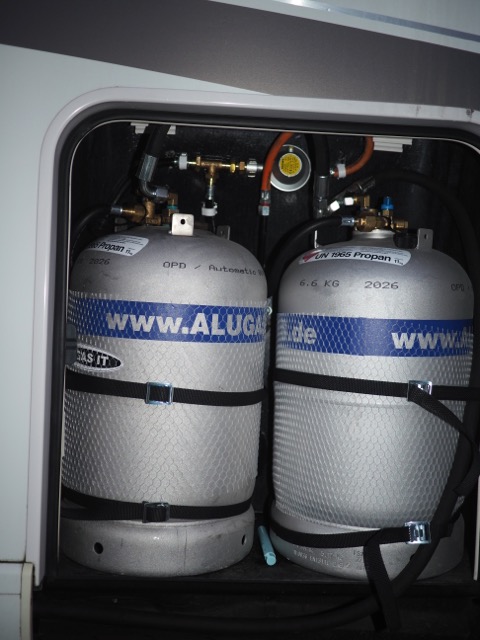
We have the space in the gas locker for 2 propane tanks and have already done the hard part of connecting up the LPG filler point so we decided to buy and fit the additional bits necessary to double our gas carrying capacity.
Our configuration now consists of two Alugas 11Kg bottles, both bottles are connected to the LPG filling point on their inputs, and both outputs are connected to a T-piece which is connected to the gas regulator. Both bottles will be filled at the same time, and gas will be used from both bottles at the same time. I cannot see the need for either a manual or an automatic switchover as both bottles will be refilled at the same time from the same fill point.
The regulator and T-piece are fastened in place by 15mm pipe clips which fit quite well and should hold it all in place.
All checked for leaks and it seems to be fine. All we need to do now is to fill up with LPG.
Regulator is above the bottles so should not become gunked up.
The aluminium bottles weigh very little so will not really impact on our van’s payload. I wanted to use the new 14kg bottles, but they would not fit the gas locker. Still, with 2 x 11Kg we should be able to survive at least 10 days before needing a fill up even in the coldest winter.
Update 8th January
We filled up with gas on Friday, putting in around 17 litres. This filled one tank which was 3/4 full anyway, and half filled the other. No smells of leaking propane, phew. Next time we’ll fill it to the brim.